In this article I want to describe a testing of one of the many protocols dedicated to the Internet of Things / Web of Things – MQTT protocol and some of the services (hosting platform and mqtt broker) which can be helpful in creating IoT-based solutions. The idea was to create an IoT-like weekend-long project for soil moisture monitoring in a flower pot through the Web.
1. What I used
For publishing and subscribing tests very helpful was MQTT.fx tool.
2. MQTT
In a few words, MQTT (Message Queue Telemetry Transport) is a very lightweight message protocol invented by IBM using TCP/IP. Communication is based on publish/subscribe scheme where MQTT broker takes care of message transportation.
Broker can provide three types of QoS (Quality of Service) such as:
– at most one message
– at least one message
– exactly one message
Once you are connected to the specified broker, you can publish message (eg.: humidity value) with a topic given by you (eg.: home/flowerpot/humidity) and any other devices connected to the same broker will get the message immediately if they just subscribe the same topic (home/flowerpot/humidity). It can’t be simpler. The client can, of course, subscribe the same topic it publishes. Just think how it is easy to create chat application with MQTT. Maybe that’s why Facebook Messenger uses it. To get more info check: http://mqtt.org/
3. Architecture
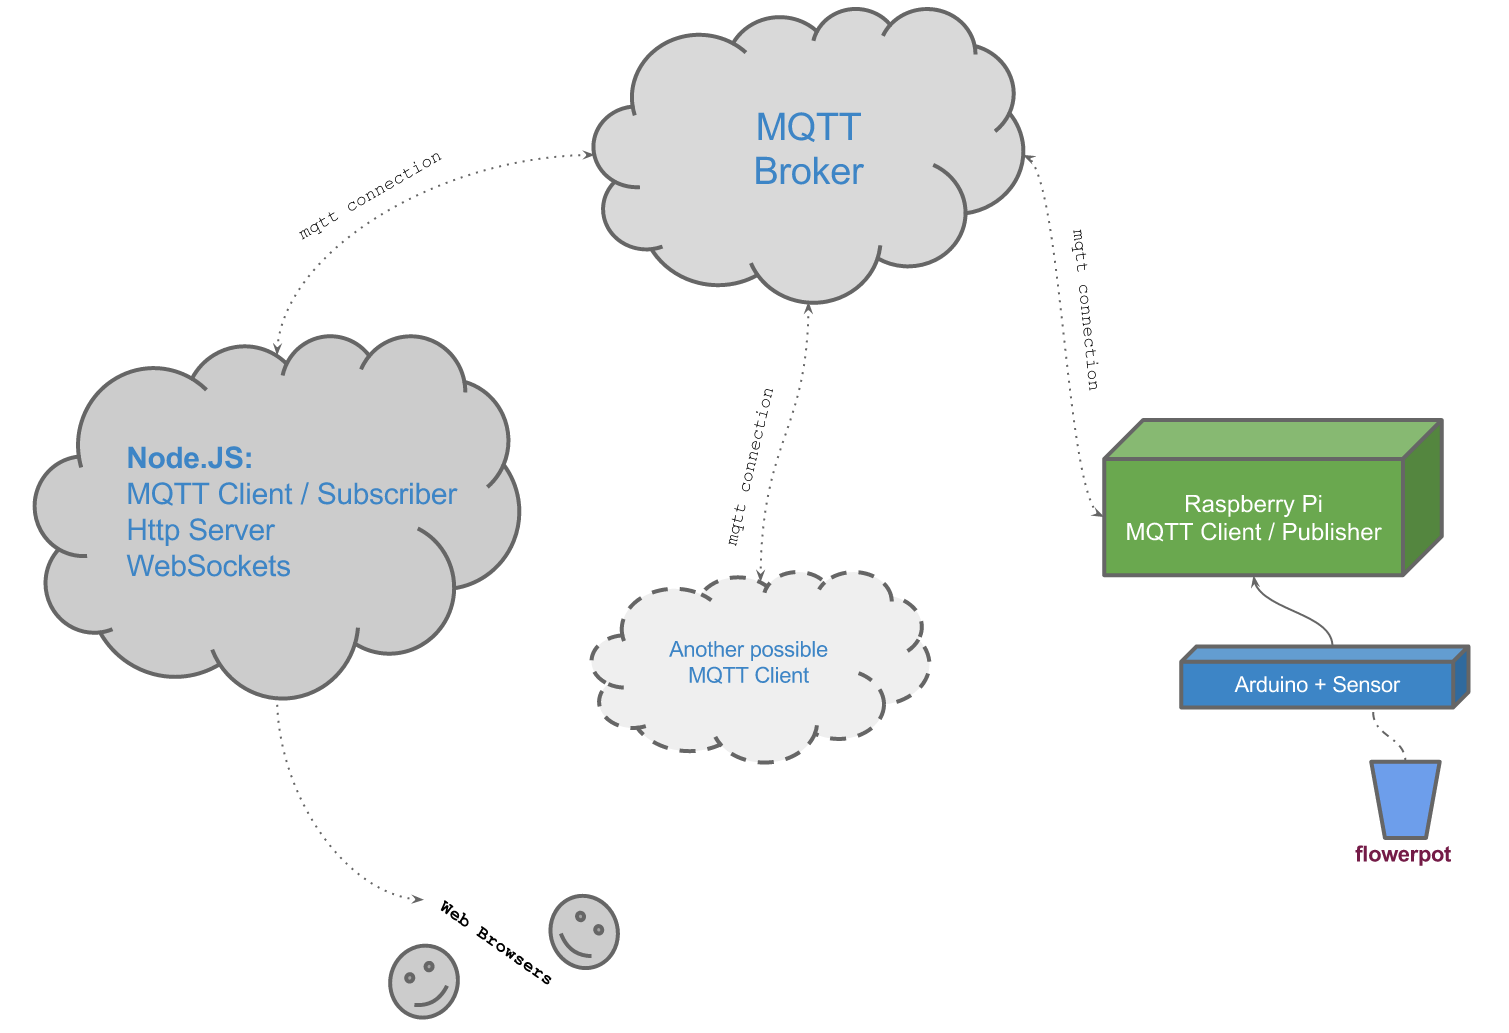
Above you can see the image of the communication architecture for my solution. I think it is clear enough, however, I will describe it in a few words. Raspberry Pi (connected to home router) runs Node.JS script which connects the MQTT Broker on specified port. Necessary data for connection with MQTT broker such as port, hostname, username and password is given in ‘Control Panel’ of CloudMQTT after creating the instance. Node.JS script also communicates with Arduino by serialport. When the data (soil humidity) comes from the Arduino’s serial port it is published to the MQTT Broker. Next, the broker emits the data for subscribers to get it. When the client (web browser) connects to the http server (on OpenShift platform), the actual value of the soil’s humidity is emitted by Node.JS’ WebSocket.
4. Sample code
Example code for Node.JS mqtt client:
connection to MQTT Broker and publishing with Node.JS mqtt (Raspberry Pi side):
var mqtt = require('mqtt');

var client = mqtt.connect('mqtt://{USERNAME}:{PASSWORD}@{HOSTNAME}:{PORT}');

var humidity = 0;
client.on('connect', function() {
// publish a message to a topic: home/flowerpot/humidity
client.publish('home/flowerpot/humidity', humidity, function() {
//client.end(); // you can close the connection when published
});
});
connection to MQTT Broker and subscribing wiht Node.JS mqtt (http server side):
var mqtt = require('mqtt');

var client = mqtt.connect('mqtt://{USERNAME}:{PASSWORD}@{HOSTNAME}:{PORT}');
client.subscribe('home/flowerpot/humidity', function() {
client.on('message', function(topic, message, packet) {
console.log("received '" + message + "' on '" + topic + "'");
// do something with message, for eg.: emit via WebSocket to the connected clients
});
});
5. Results
Client-side is just a simple animation created with HTML Canvas. Data is being sent from the server in realtime via WebSocket. The reaction (flower pot animation) is almost immediate. Here is the website: http://sweething-iothings.rhcloud.com/ However, I don’t know how long it will be available :-)
MQTT is a great protocol for exchanging small messages. It fits IoT needs very well as devices are powered from batteries. From the energy consumption point of view, the lower overhead means that sending a message takes less time, and yet, time is the energy. The sooner the device goes into sleep mode the better for its battery lifetime.
